
# 😀Emojify😀
一个允许玩家在聊天中使用表情符号的插件,利用内置的资源包字体函数。
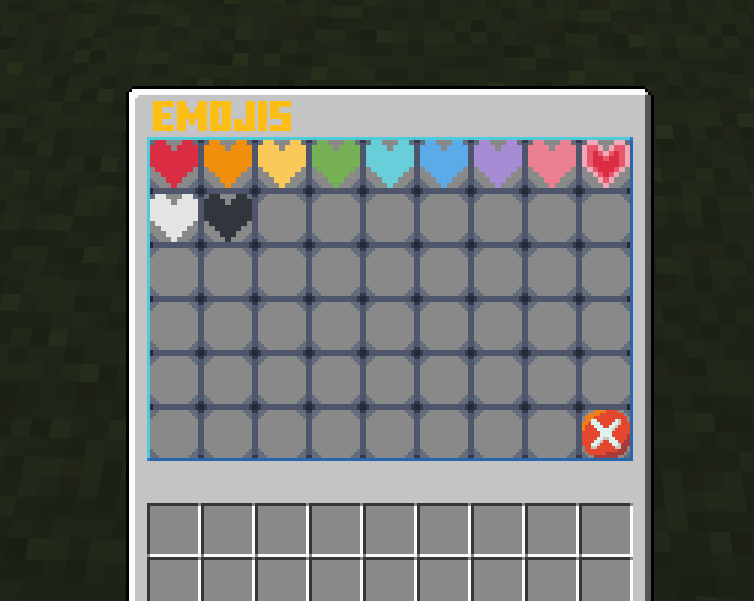
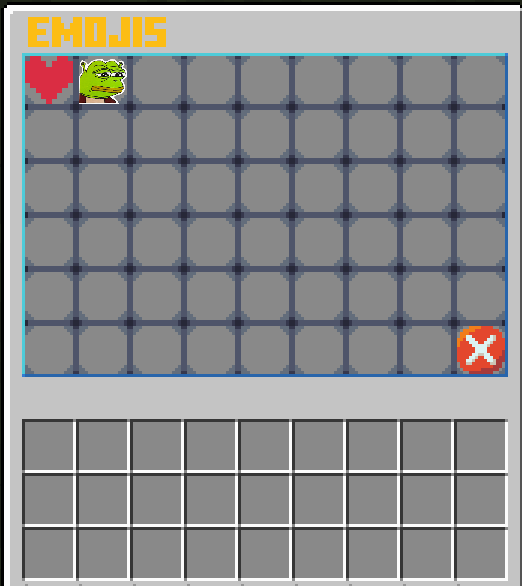
输入 ```/emoji``` 命令打开面板。
# 功能
- 🥳自定义表情🥳
- 自定义 UI
- 自动资源包下载器
# 设置
- 要创建自己的表情符号,首先需要一个表情符号的 ```.png``` 文件。
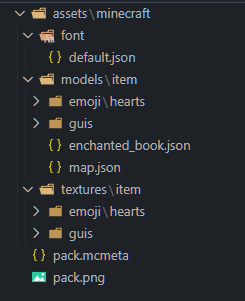
- 然后,我建议将您的表情符号基于已经内置的表情符号,您可以从 [这里](https://github.com/TechnicFox/Emojify/blob/master/data/Emojify.zip) 的 GitHub 获取这些表情符号。然后从 ```Emojify.zip``` 中提取资源包并在您选择的编辑器中打开,我将使用 VSCode。您应该看到类似以下内容:
资源包
- 我将添加一个史莱克表情符号:
史莱克

- 首先,将您的 ```image.png``` 放入 ```assets/minecraft/textures/item/emoji/[您的文件夹]/image.png``` 中。**警告**: 您的 ```image.png``` 应该全部小写
- 然后,转到 ```assets/minecraft/font/default.json``` 并为从 [这里](https://perchance.org/r27a7fey6l) 获取的随机 Unicode 字符创建一个新的位图。
示例
```
{
"providers": [
{"type": "bitmap", "file": "minecraft:item/guis/pixel.png","ascent": -2000,"height": -3,"chars": ["七"]},
{"type": "bitmap", "file": "minecraft:item/guis/upper_section.png","ascent": 13,"height": 222,"chars": ["ㇺ"]},
{"type": "bitmap", "file": "minecraft:item/emoji/hearts/red_heart.png", "ascent": 8, "height": 10, "chars": ["媀"]},
{"type": "bitmap", "file": "minecraft:item/emoji/hearts/orange_heart.png", "ascent": 8, "height": 10, "chars": ["鬣"]},
{"type": "bitmap", "file": "minecraft:item/emoji/hearts/yellow_heart.png", "ascent": 8, "height": 10, "chars": ["觮"]},
{"type": "bitmap", "file": "minecraft:item/emoji/hearts/green_heart.png", "ascent": 8, "height": 10, "chars": ["継"]},
{"type": "bitmap", "file": "minecraft:item/emoji/hearts/light_blue_heart.png", "ascent": 8, "height": 10, "chars": ["佃"]},
{"type": "bitmap", "file": "minecraft:item/emoji/hearts/blue_heart.png", "ascent": 8, "height": 10, "chars": ["青"]},
{"type": "bitmap", "file": "minecraft:item/emoji/hearts/purple_heart.png", "ascent": 8, "height": 10, "chars": ["橙"]},
{"type": "bitmap", "file": "minecraft:item/emoji/hearts/pink_heart.png", "ascent": 8, "height": 10, "chars": ["紫"]},
{"type": "bitmap", "file": "minecraft:item/emoji/hearts/heartpulse.png", "ascent": 8, "height": 10, "chars": ["梾"]},
{"type": "bitmap", "file": "minecraft:item/emoji/hearts/white_heart.png", "ascent": 8, "height": 10, "chars": ["白"]},
{"type": "bitmap", "file": "minecraft:item/emoji/hearts/black_heart.png", "ascent": 8, "height": 10, "chars": ["黒"]},
{"type": "bitmap", "file": "minecraft:item/emoji/shrek/pepe_shrek.png", "ascent": 8, "height": 10, "chars": ["ࢢ"]}
]
}
```

您可以更改“ascent”和“height”来更改其显示方式
- 然后创建新 json 文件 ```assets/minecraft/models/item/emoji/[您的文件夹]/[您的表情符号名称].json``` 并将以下内容粘贴到其中:
示例
```
{
"parent": "minecraft:item/generated",
"textures": {
"layer0": "minecraft:item/emoji/shrek/pepe_shrek"
}
}
```
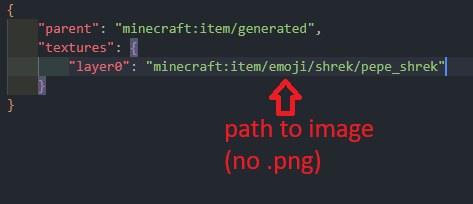
**警告**: 在文件路径末尾不要使用 ```.png``` 扩展名
- 然后转到 ```assets/minecraft/models/item/enchanted_book.json``` 并添加您之前创建的模型:
示例 enchanted_book.json
```
{
"parent": "minecraft:item/generated",
"textures": {
"layer0": "minecraft:item/enchanted_book"
},
"overrides": [
{"predicate": {"custom_model_data": 101}, "model":"minecraft:item/emoji/hearts/red_heart"},
{"predicate": {"custom_model_data": 102}, "model":"minecraft:item/emoji/hearts/orange_heart"},
{"predicate": {"custom_model_data": 103}, "model":"minecraft:item/emoji/hearts/yellow_heart"},
{"predicate": {"custom_model_data": 104}, "model":"minecraft:item/emoji/hearts/green_heart"},
{"predicate": {"custom_model_data": 105}, "model":"minecraft:item/emoji/hearts/light_blue_heart"},
{"predicate": {"custom_model_data": 106}, "model":"minecraft:item/emoji/hearts/blue_heart"},
{"predicate": {"custom_model_data": 107}, "model":"minecraft:item/emoji/hearts/purple_heart"},
{"predicate": {"custom_model_data": 108}, "model":"minecraft:item/emoji/hearts/pink_heart"},
{"predicate": {"custom_model_data": 109}, "model":"minecraft:item/emoji/hearts/heartpulse"},
{"predicate": {"custom_model_data": 110}, "model":"minecraft:item/emoji/hearts/white_heart"},
{"predicate": {"custom_model_data": 111}, "model":"minecraft:item/emoji/hearts/black_heart"},
{"predicate": {"custom_model_data": 201}, "model":"minecraft:item/emoji/shrek/shrek"}
]
}
```
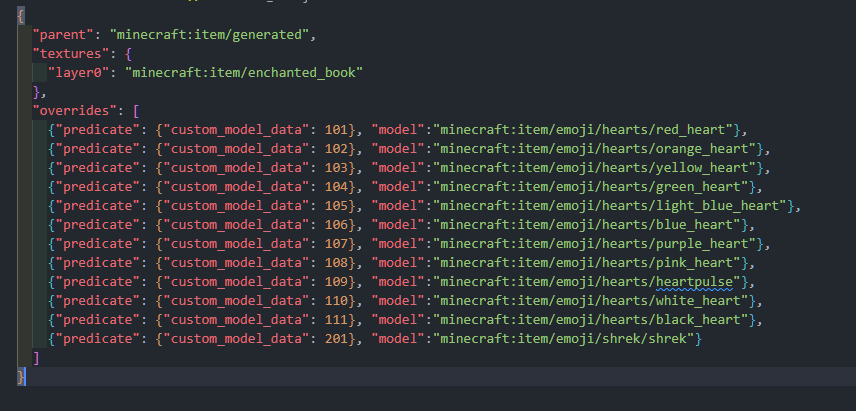
**警告**: 在文件路径末尾不要使用 ```.json``` 扩展名,并确保自定义模型数据按数值顺序递增,否则将无法显示自定义物品
- 最后,转到您的服务器并修改 ```plugins/Emojify/config.yml```,如下所示:
示例 config.yml
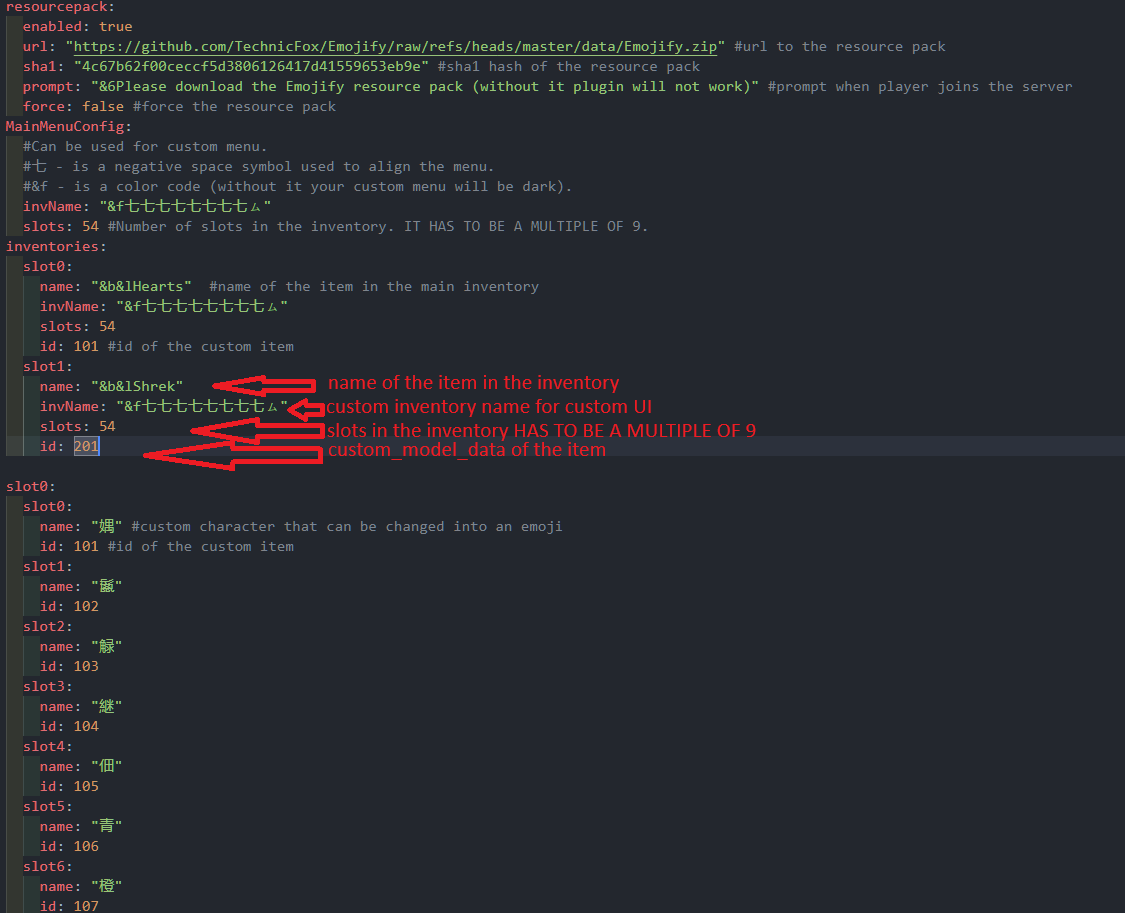
```
inventories:
slot0:
name: "&b&lHearts" #item in the main inventory 的名称
invName: "&f七七七七七七七七ㇺ"
slots: 54
id: 101 #自定义物品的 ID
slot1:
name: "&b&lShrek"
invName: "&f七七七七七七七七ㇺ"
slots: 54
id: 201
```
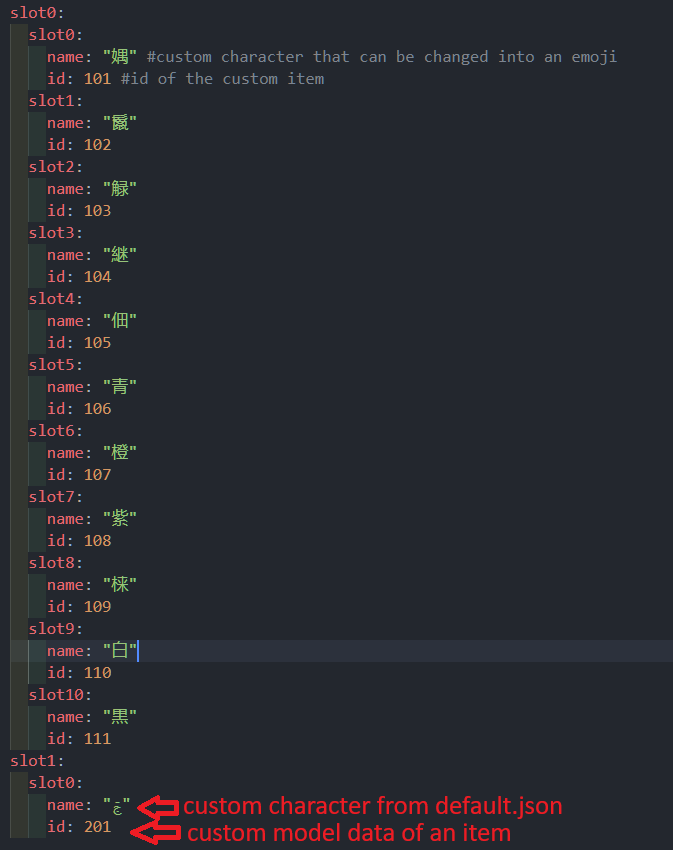
```
slot1:
slot0:
name: "ࢢ"
id: 201
```
- 最后,将您的资源包压缩为 ```.zip``` 并将其上传到 [mc-packs.net](https://mc-packs.net/),然后输入 URL 和哈希值到 ```plugins/Emojify/config.yml```。
上传资源包
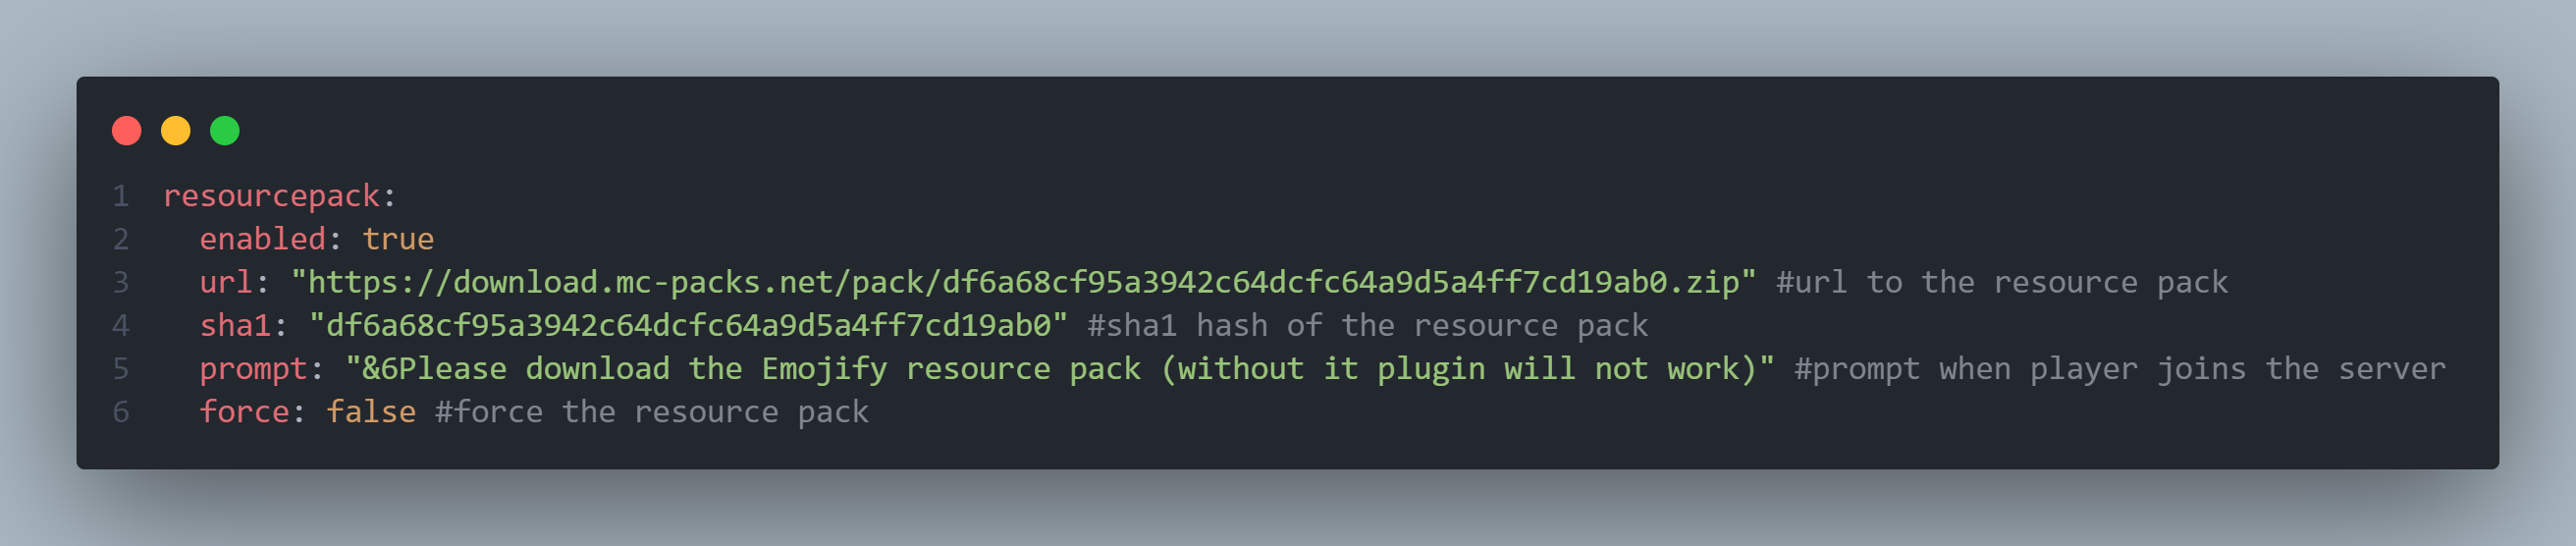
```
resourcepack:
enabled: true
url: "https://download.mc-packs.net/pack/df6a68cf95a3942c64dcfc64a9d5a4ff7cd19ab0.zip" #资源包的 url
sha1: "df6a68cf95a3942c64dcfc64a9d5a4ff7cd19ab0" #资源包的 sha1 哈希
prompt: "&6请下载 Emojify 资源包(没有它插件将无法工作)" #当玩家加入服务器时的提示
force: false #强制资源包
```
结果

# 常见问题
## 为什么创建表情符号需要这么长时间?
我知道,我正在计划开发某种自动化的工具
## 我发现了一些漏洞或故障,或者我有一个建议!!!
随时在 Discord 上与我分享建议、错误和故障:[TechnicFox](https://discordapp.com/users/754726129675403426)
## 你说有自定义 UI
我还在试验这个功能,但现在您可以尝试修改 ```assets/minecraft/textures/item/guis/upper_section.png```